An Android App
In this tutorial we are going to make an Android app. We will do this using PHP for the generation of the data and with Java and XML for the creation of the real Android app. As a data format we will use JSON, so if you haven’t read my previous article about JSON, read it first. I won’t assume knowledge of Android/Java, but I expect you to know PHP. As data I will use a fictional news feed. All code can be found in the GitHub repo, of which some is unfortunately in Dutch.
The server-side part
To start with, we are going to develop the server-side part. This will become a bootstrap and an index-file. bootstrap.php will look as follows:
|
|
This is the source of index.php:
|
|
Installation Android SDK
To develop Android apps, you need the Android SDK. Visit developer.android.com/sdk and download the ADT bundle. This bundle contains everything you need to create Android apps, which includes Eclipse (an IDE), the SDK itself and the tools. Unzip the bundle on a place where you can easily find it back, it isn’t an installation. On Windows, unzip it at for example C:\adt-bundle-windows.
To not type the full paths every time you execute a command, we will add the SDK tools to the PATH. In Windows you right-click on This Computer and then you choose Properties. Click on Advanced and then on Environment Variables. Select PATH in System variables and add this to the end:
;C:\adt-bundle-windows\sdk\platform-tools;C:\adt-bundle-windows\sdk\tools
Naturally, you must add the correct path. You can test it by opening a new command prompt and then typing adb devices. It works if it gives an output like this:
* daemon not running. starting it now on port 5037 *
* daemon started successfully *
List of devices attached
If it gives an error, check all previous steps, or follow on of these tutorials: Windows, Mac or Linux.
Now type android in the command prompt. A window should open. In this window, select Android 4.4 (API 19) -> SDK Platform. Then click Install packages and accept the licenses.
A first start
To start you should open Eclipse. This is in the eclipse directory under the directory to which you unzipped the bundle. Click on the executable. For Windows users this is eclipse.exe. Eclipse should start now. After it has started, click on New -> Android Application Project in the File menu. As Application name you supply a name such as Android Tutorial. In the field Package name you should enter a unique package name. This is most of the times something like com.koenv.tutorial or nl.yourname.app. Leave the other settings at their defaults and do the same in the other screens. Then click on Finish.
If you did everything correctly, you should see the Package explorer at the left and in the middle you should see two files named MainActivity.java and activity_main.xml.
To start you should know what every file/directory does:
AndroidManifest.xml
In this file all information of the app are described, which includes permissions and activities (the windows of your app).
src/
This directory contains all Java code, so in this directory your real activities exist, the manifest only refers to it.
res/
This directory contains all resources, such as app-icons, layouts and translations.
To start you can try running the app.
If you have an Android device, you should now attach it to your PC. Turn USB-Debugging on in Developer Options on your Android device and make sure all drivers are installed (http://developer.android.com/tools/extras/oem-usb.html). Now execute adb devices in the command prompt and make sure it shows a device. Now switch over to Eclipse and click Run. In this window you should select ‘Android application’ and your app should appear on your device within seconds :).
If you don’t have an Android device, you should open the Android Virtual Device Manager via Help -> Android Virtual Device Manager in Eclipse. Now click on New and give the emulator a name, a SD-card size and a platform (which is API 19 in your case). Click Create AVD and then click start. When you emulator has started up, you should first unlock the screen. Then switch over to Eclipse. In this window you should select ‘Android Application’ and your app should appear within seconds :).
If nothing happens when you click Run, make sure you are in the tab of MainActivity.java.
The layout
In Android you build layouts using XML. You don’t have to type it yourself, but you can do that. We will just use the simple layout editor. Open activity_main.xml and make sure the Graphical editor is selected at the bottom. Delete the TextView shich says Hello World. Now drag ListView from the tab Composite on the left and drop it on the virtual phone. Make sure it is added in the upper left-hand corner. That is the whole layout for this app! (activity_main.xml)
If you were to run the app now, you wouldn’t see anything. We are going to change this. Firstly, add a new class to your package by right clicking on your package and selecting New -> Class. As name we will use Article. Now click Finish. We are going to add the fields you also have in the JSON. Add this to the class (I assume the syntax is not completely new for you, it looks a lot like PHP):
    private int id;
    private String title;
    private String content;
    private String slug;
Now select Source -> Generate getters/setters. Select all fields and click OK. Next, we are going to generate a constructor, so select Source -> Generate constructor using fields. As in the previous window, select everything. The full class can be found here.
Filling the list
To fill the list, you need an adapter in Android. An adapter makes sure your own object are displayed in the correct way on the list. In this tutorial we will build one ourselves. Create a new class named ArticleAdapter.java. Now make sure it extends BaseAdapter:
public class ArticleAdapter extends BaseAdapter {Now a red lines will appear under BaseAdapter. This is because you haven’t imported it yet. Importing is comparable to PHP’s use statement for namespaces. Hover over BaseAdapter and click Import ‘BaseAdapter’ (android.widget). If everything went well, the red line should be gone, but another one appeared. This is because BaseAdapter has a few abstract methods you must override. Hover over ArticleAdapter and click Add unimplemented methods. If you did it correctly, a few new methods should appear. Firstly, we are going to add some fields and write a constructor. This looks as follows:
    private Context context;
    private ArrayList<Article> items;

    public ArticleAdapter(Context context, ArrayList<Article> items) {
        super();
        this.context = context;
        this.items = items;
    }
The Context is probably the most important class in Android development. You can (and must) do a lot with this class, that’s why we need it in this class. An ArrayList is an array, but then as an object. The
Now we are going to implement the method getCount(). This is actually very simple, you just return the size of the ArrayList:
    @Override
    public int getCount() {
        return items.size();
    }
The yellow line under the field items is now also gone.
Now we are going to implement getItem(), this is just as simple:
    @Override
    public Object getItem(int position) {
        return items.get(position);
    }
Now getItemId(). Our IDs are the same as the positions, so that is even simpler.
    @Override
    public long getItemId(int position) {
        return position;
    }
Now the most complex method, the getView() method:
    /**
     * This is used for a performance boost.
     */
    static class ViewHolder {
        public TextView title;
        public TextView text;
    }

    @Override
    public View getView(int position, View convertView, ViewGroup parent) {
        View view = convertView;
        if (view == null) {
            // Make sure we can inflate (create the layout from the XML file) the layout
            LayoutInflater inflater = (LayoutInflater) context
                    .getSystemService(Context.LAYOUT_INFLATER_SERVICE);

            // Create a default view with 2 lines
            view = inflater.inflate(android.R.layout.simple_list_item_2,
                    parent, false);

            // Performance boost!
            ViewHolder viewHolder = new ViewHolder();
            viewHolder.title = (TextView) view.findViewById(android.R.id.text1);
            viewHolder.text = (TextView) view.findViewById(android.R.id.text2);
            // And save it for the next time we use it.
            view.setTag(viewHolder);
        }

        // We can get the performance back here :)
        ViewHolder holder = (ViewHolder) view.getTag();

        // This is the article we should show
        final Article article = items.get(position);

        // On the first line we show the title...
        holder.title.setText(article.getTitle());
        // ...and on the second the content
        holder.text.setText(article.getContent());

        // And now we are going to show a 'Toast' when you click the item.
        view.setOnClickListener(new View.OnClickListener() {

            @Override
            public void onClick(View v) {
                // Here we create the Toast
                Toast.makeText(
                        context,
                        "You clicked on article " + article.getId()
                                + " with slug " + article.getSlug(),
                        Toast.LENGTH_LONG).show();

            }
        });

        return view;
    }
Press Ctrl+Shift+O again. I hope you understand the code when you read the comments. If not, please leave a comment.
Filling the list for real
We now have all ingredients to fill the list, so we will just start. First open MainActivity.java and add a few fields:
    // Our list
    private ListView listView;
    // Our articles
    private ArrayList<Article> articles;
    // Our adapter
    private ArticleAdapter adapter;
    [/code]
    Now we are going to modify onCreate()
    [size=small]MainActivity.java[/size]
    [code lang=java file=MainActivity.java]
    @Override
    protected void onCreate(Bundle savedInstanceState) {
        super.onCreate(savedInstanceState);
        // Set the correct layout
        setContentView(R.layout.activity_main);

        // This part is new
        // We want a reference to our list from the layout
        this.listView = (ListView) this.findViewById(R.id.listView1);

        // We first initialize our list of articles
        this.articles = new ArrayList<Article>();
        // With that we create our adapter
        this.adapter = new ArticleAdapter(this, articles);
        // And then we tell the list he should take help from the adapter :)
        this.listView.setAdapter(this.adapter);
    }
To test this code, you can add this at the end of the method:
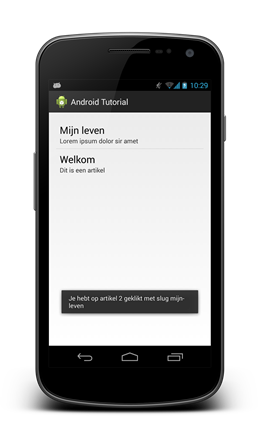
    this.articles.add(new Article(2, "My life", "Lorem ipsum dolor sir amet", "my-life"));
    this.articles.add(new Article(1, "Welcome", "This is an article", "welcome"));
Using this piece of code, we add two articles to the list. Make sure you delete this after you have tested it. Does your app crash or doesn’t it work? Compare it with the code in the GitHub repo. The app should look like this:
Now we are going to make sure the list is reloaded every time the activity is made visible. Add these methods:
    @Override
    protected void onResume() {
        super.onResume();
        // We reload the list every time we resume the activity
        this.reloadList();
    }

    /**
     * Here we should refresh the list
     */
    protected void reloadList() {

    }
Connection to the internet
First of all, we are going to make sure you may even access internet. Open AndroidManifest.xml and visit the tab Permissions. Click on Add, select Uses Permissions and click OK. Search for android.permissions.INTERNET in the list at the right and save the file. You now have access to the internet!
I am lazy, so I’m not going to write the code to connect to the internet myself, there is a library for that! Visit http://loopj.com/android-async-http and click Download. Save the file in the libs directory of your Android project. Now go back to Eclipse, right-click on your libs directory and click Refresh. Library loaded!
Now we are going to implement reloadList(). First we make the HTTP client and we execute a request (these classes are from the library):
    protected void reloadList() {
        AsyncHttpClient client = new AsyncHttpClient();
        client.get("http://www.koenv.nl/phphulp/android/index.php",
                new JsonHttpResponseHandler() {

                });
    }
You can use my server or replace http://www.koenv.nl/phphulp/android/index.php by your own URL. The method first creates a HTTP Client and then it executes a GET request to http://www.koenv.nl/phphulp/android/index.php. The response will be handled by JsonHttpResponseHandler. We will have to further implement the handler. First, we are notifying the user when an error occurs:
    protected void reloadList() {
        AsyncHttpClient client = new AsyncHttpClient();
        client.get("http://www.koenv.nl/phphulp/android/index.php",
                new JsonHttpResponseHandler() {
                    @Override
                    public void onFailure(Throwable e, JSONObject response) {
                        try {
                            Toast.makeText(
                                    MainActivity.this,
                                    "An error occured: "
                                            + response.getString("error"),
                                    Toast.LENGTH_LONG).show();
                        } catch (JSONException e1) {
                            Toast.makeText(MainActivity.this,
                                    "An unknown error occured: " + e1.getMessage(),
                                    Toast.LENGTH_LONG).show();
                        }
                    }
                    @Override
                    public void onFailure(Throwable e, String response) {
                        Toast.makeText(MainActivity.this,
                                "An unknown error occured: " + e.getMessage(),
                                Toast.LENGTH_LONG).show();
                    }
                });
    }
Now the user will get a Toast with one of the message we programmed. The methods are more complete in the GitHub repository so you can better debug when something goes wrong.
    protected void reloadList() {
        AsyncHttpClient client = new AsyncHttpClient();
        client.get("http://www.koenv.nl/phphulp/android/index.php",
                new JsonHttpResponseHandler() {
                    @Override
                    public void onSuccess(JSONArray response) {
                        try {
                            // First clear all articles
                            articles.clear();
                            for (int i = 0; i < response.length(); i++) {
                                // Now we want the JSON object on place i
                                JSONObject object = response.getJSONObject(i);
                                // In that object, we search all values we need
                                // for our Article object
                                int id = object.getInt("id");
                                String title = object.getString("title");
                                String content = object.getString("content");
                                String slug = object.getString("slug");
                                // Then we create our Article object
                                Article article = new Article(id, title,
                                        content, slug);
                                // And we add this to the list
                                articles.add(article);
                            }
                        } catch (JSONException e) {
                            Toast.makeText(MainActivity.this,
                                    "An unknown error occured",
                                    Toast.LENGTH_LONG).show();
                            // With this, you can see the error in Logcat
                            // (click on DDMS in the upper right-hand corner in Eclipse)
                            Log.e("PHPHulp", response.toString(), e);
                        } finally {
                            // And here we say that our list has changed and
                            // must be refreshed
                            adapter.notifyDataSetChanged();
                        }
                    }

                    // here the onFailure()s I showed you earlier.
                });

    }
I assume you now know you should try using Ctrl+Shift+O when there are red lines. If they don’t disappear when you use this, hover over the red line and try if you understand the error. If not, search the internet or ask in the comments.
The end
This finished our app, and now you can start modifying it to your wishes, like using it for your own blog. If you need more help on Java, there are tutorials at Oracle. For another tutorial about Android development, see the Android developer site. On this official Android site for developers there is of course a lot of information about Android development. Do you have questions, remarks or did something not go well, please comment! Once again, I recommend looking in the GitHub repository.